23 May 2014

DIY Anti monster spray - FREE printable


My friend's most amazing tip to rid your child’s fear of scary monsters at bed time comes in a spray bottle! That's right, just use a squirt bottle (with water in it) to spray away those uninvited monsters! 

Here's how:
1. Simply print my label out on a piece of A4 paper, trim to the appropriate size
2. Stick to any spray bottle with water inside
3. If you can, add some scent to the water for added magical ghost repelling qualities. Lavendar is a great essential oil for bed time!


Sweet dreams!!

Make sure you follow me on facebook, pinterest and twitter, for more daily creative inspiration!


14 May 2014

Be YOU tiful - hand lettering by Maiko Nagao


Be YOU tiful. So simple yet so powerful. This is part my 365 days of type mission! Check out my other hand lettered work here!


LOVE my work? You can now purchase my prints from www.maikonagao.com


Make sure you follow me on facebook, pinterest and twitter, for more daily creative inspiration!


12 May 2014

365 Days of Type - Hand lettering by Maiko Nagao


Currently feeling oh so inspired by Vincent Van Gogh's quote 'There is nothing more truly artistic than to love people". To view my other hand lettering pieces, please click here!

Make sure you follow me on facebook, pinterest and twitter, for more daily creative inspiration!


10 May 2014

Happy Mother's Day! Hand lettering by Maiko Nagao


Happy Mother's Day to all the mum's out there! Here's a blinged up Mother's Day card version I sketched up earlier this week again as part of my 365 days of type.


LOVE my work? You can now purchase my prints from www.maikonagao.com


Make sure you follow me on facebook, pinterest and twitter, for more daily creative inspiration!


5 May 2014

DIY Chalkboard paint in any colour by A Beautiful Mess


Here's a super easy chalkboard paint tutorial by A Beautiful Mess. Remember you can use this chalkboard paint on anything from walls, dishes and objects!

Make sure you check out A Beautiful Mess' full tutorial here!

Don't forget to follow me on facebook, pinterest and twitter, for more daily creative inspiration!


4 May 2014

Mother's Day card - free download by Maiko Nagao


It's Mother's Day in exactly one week! Do you have anything special planned? Today's creation as part of my 365 days of type is this card. I really mean this. If my mum wasn't my mum I would totes pick her has my bestie!


Make sure you print on a thick A4 card and set it to 'fit to page' when printing. There are two grey lines at the top and bottom as markers for you to cut in half to make two. 

Don't forget to download out my other 'You're so freakin' awesome mum' Mother's Day card here.

Make sure you follow me on facebook, pinterest and twitter, for more daily creative inspiration!

*Please note these cards are for personal use only and not to be sold or redistributed.


2 May 2014

365 Days of Type continues... Hand lettering by Maiko Nagao


Here are a couple more hand lettering pieces to add to my 365 Days of Type mission! The first one "She's a dreamer, a doer. She sees possibilities everywhere" is what keeps me motivated and inspired to do this mission. You can purchase it from my Society6 shop here!

Make sure you follow me on facebook, pinterest and twitter, for more daily creative inspiration!


Currently inspired by this quote - 365 Days of Type by Maiko Nagao


My quest to do a sketch a day lives on... Here is today's creation. Dalai Lama's beautiful quote. "The world doesn't need more successful people. The planet desperately needs more peacemakers, healers, restorers, storytellers and lovers of all kinds." Ahhh... I have put it up on my wall to remind me at all times.

If you have any quotes that inspires you please let me know in the comments section below!

You can follow me on facebook, pinterest and twitter, for more daily creative inspiration!


23 April 2014

DIY No sew scarf pillow cover in 5 minutes by Creature Comforts


Check out this gorgeous DIY no sew pillow cover tutorial by Creature Comforts!

All you will need is a large light-weight scarf, and a throw pillow insert. The pillow used here is 16″x16″ and the scarf is 76″x40.” 

Make sure you check out Creature Comforts blog for full tutorial here.


21 April 2014

DIY Brownie mix in a jar gift by Call me Cupcake


Homemade gifts are so sweet, especially ones that taste good! This idea by Call me cupcake is just adorable! Make sure to pack everything tightly (especially the flour and cocoa powder) to keep everything in it's place. You also need to write down a set of cooking instructions which is at the bottom of the recipe!

Check out Call me cupcake's page for full instructions and more amazing pics!

Follow me on facebook, pinterest, instagram and twitter, for more daily creative inspiration!


17 April 2014

DIY Paper plate Easter bunny ears in 2 minutes! By Alpha Mom


All you need to make this cute Easter bunny hat is some paper plates and a pair of scissors! Check out full tutorial along with other cool holiday hats at Alpha Mom here.

Just fold the paper plate and cut along the dotted lines!

Happy crafting everyone!

Follow me on facebook, pinterest, instagram and twitter, for more daily creative inspiration!


14 April 2014

Kseniya Simonova walked out on stage and blew everyone away!


I have never seen anything as creative and as touching as this. This is Kseniya Simonova, and she’s the talent of Ukraine's Got Talent.

You can say I am totally creatively inspired right now.

10 April 2014

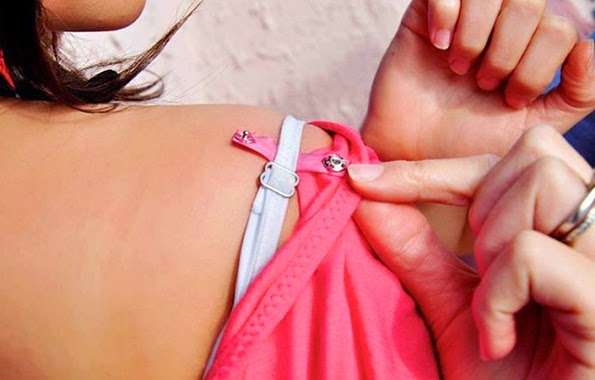
DIY Sew a bra strap holder into your top - video tutorial by Sally Ann


DIY Sew a Bra Strap Holder Into Your Top from Sally Ann on Vimeo.

This is seriously what I need right now! If you’re tired of your bra straps showing, it’s time to add a strip of fabric with a snap to hold them in place. This is the best idea ever for those shirts that tend to slide off your shoulders. All you have to do is to sew in a simple clip to attach around your bra. Enjoy! Thanks for the awesome tutorial Sally Ann! Make sure you check out her blog here.

Make sure you follow me on facebook, pinterest and twitter, for more free printables and daily creative inspiration!

Enjoy!


Image source

9 April 2014

DIY: How to fold a bunny napkin


To make these festive Easter bunny napkins by A taste of home, start with well-starched square napkins. Fold the bottom third of the napkin up and the top third down, making a rectangle. 

Step 1. Find the center along the top and fold the top corners down, making sure the bottom ends are even.
Step 2. Fold up the outside bottom corners.
Step 3. Fold left and right sides so that they meet in the center.
Step 4. Turn the napkin over and flip the top to bottom. Fold bottom point up.
Step 5. Fold the left and right corners to the back and tuck one corner into the other to hold.
Step 6. Hold the tucked corners securely and pull out the bunny ears on the other end.

View full tutorial here.

Make sure you follow me on facebook, pinterest and twitter, for more free printables and daily creative inspiration!

*Please note these cards are for personal use only and not to be sold.

Enjoy!


6 April 2014

Free printable Birthday card by Maiko Nagao


This was a quickie, but a Birthday card for a friend of mine I designed. I thought it was pretty neat so I'm sharing it with you all! You can download it FREE from the link below.


Make sure you print on a thick A4 card and set it to 'fit to page' when printing. There are two grey lines at the top and bottom as markers for you to cut in half. 

Make sure you follow me on facebook, pinterest and twitter, for more free printables and daily creative inspiration!

*Please note these cards are for personal use only and not to be sold.

Enjoy!


1 April 2014

What the?! Kate Moss was seen wearing my 'Tsuru Bird' T-shirt?!


He he he ok, sorry!  Urban Outfitters did a similar stunt last year... they fooled me so bad that I just had to do it too! You have to admit Kate does look pretty funky in my Tsuru Bird design, right?! 

Happy April fools day everyone! You can however, purchase my T's here!

What kind of crazy stunts did you pull today?

Make sure you follow me on facebook, pinterest and twitter for more daily creative inspiration!


22 March 2014

DIY: Balencia inspired no sew crop top


Here is A pair & a spair's genius Balencia inspired DIY crop top tutorial!

You will need:
- A white tank dress or extra long singlet
- Scissors
- Needle and thread

1. The first step is to cut the back out of the tank to create the crop, so measure a line a few inches below the bottom of your bra strap when the top is on where you will cut to. Then lay the tank face down and cut out the back, following the line of the seams and the horizontal line.
2. This is how the back should look.
3. Turn your singlet over and mark the very middle of the front. Cut a straight line down the middle, as if you are cutting the opening of a cardigan.
4. Cut all the way to the bottom.
5. This is the shell of your top, you’re practically there!
6. Now Mrs mannequin is going to demonstrate how to wrap the top. Simply tie the leftover fabric in a knot and let it hang down but you can also cut it short if you like.
7. Tuck the top edges of the singlet into your bra.
8. Finally, if you like the look of the gathered straps, use your needle and thread to sew a little dart into them.

Voila! For the full tutorial make sure you check out A pair & a spair's fab site here!

You can follow me on facebook, pinterest and twitter, for more daily creative inspiration!


21 March 2014

Busy picture children's illustration by Maiko Nagao


Here is a commission piece I illustrated for an educational collateral in Borneo. I was given a huge list of vocab and my task was to put them all in one picture. Talk about a challenge! My inspiration for this piece was none other than the amazing Richard Scarry and his wonderful detailed illustrations I spent forever pouring over as a child!

If you would like an illustration done by moi, please email me at maiko.nagao@gmail.com! I would love to work with you!


You can follow me on facebook, pinterest and twitter, for more daily creative inspiration!


Personalised wedding heart name logo by Maiko Nagao


I totally love this wedding logo by Seven Swans! I was personally requested to design something similar via my Etsy shop. What do you think?


If you love it as much as I do, you can order from my Etsy shop here.


You can follow me on facebook, pinterest and twitter, for more daily creative inspiration!


12 March 2014

Personalised name logo for wedding, anniversary, engagements by Maiko Nagao


This makes a beautiful and extremely personal wedding, engagement, valentines, birthday or anniversary gift. Just print out the A4 sized pdf, and have it framed! This was for the gorgeous Ivy and her husband Chris - my Facebook competition winners.

If you love it, you can order from my Etsy store here.


You can follow me on facebook, pinterest and twitter, for more daily creative inspiration!


28 February 2014

DIY Upcycled tire into a ottoman seat


I am totally making these DIY ottoman's for my dream home via casa.com.br! You can also view the full English tutorial via Handimania.

You will need:
- A tire, MDF (Medium-density fibreboard) cut into two circles of 55 cm diameter, Six screws, a drill, a screwdriver, hot glue gun with at least 6 tubes of glue, 5m long and 10mm thick natural sisal twisted rope, a cloth, scissors and concentrated brush sealer.

1. Place one MDF on a tire, drill three holes and screw your MDF tightly.
2. With the hot glue gun, apply the glue on the board and secure one end of rope. Press the tip to adhere well and go round in a snail shape.
3. After you have finished covering MDF with a rope, do the same with the edge of your tire. Go around putting enough glue.
4. Turn the tire upside down and continue covering it with a rope until you reach the edge of the board
MDF base, as it will be lying directly on the ground.
5. Apply the sealer to the brush and cover all surface with it. Wait one hour before you put another coat on it. This sealer is ready to touch after one day but the complete drying takes two weeks!

Voila!


You can follow me on facebook, pinterest and twitter, for more daily creative inspiration!


Related Posts Plugin for WordPress, Blogger...
Pin It button on image hover